Showing posts with label progress. Show all posts

Wednesday, June 3, 2015

{house 2} Home Tour

This is super brief, but I spent all of naptime tidying up for these pictures. Sometimes it's just hard to get the ball rolling and clean up after a weekend trip.

Ethan's room pictures will be added later as he was asleep during all of these so I couldn't get in there! He has a huge room with a sink area between his room and the shared bath (hollywood style).

Welcome!


half bath off entryway

Our very gated stairs

Formal living with view of gameroom
(up) and dining


Dining room: table to come


Kitchen & breakfast nook
with table I refinished

Master bed

Master bath


Upstairs game room

Shared upstairs bath (another vanity is in
Ethan's room)


Upstairs hallway: large closet, bath,
Ethan's room, Hannah's room, and
an office around the corner on the left.

Sneak peak of Hannah's room


My new vinyl print! I love it.

Austin's (messy!) desk nook

Purple shelves and green walls (why?)

xo,


UPDATE:
Here are Ethan's room pictures!


Saturday, April 18, 2015

Haynes home #2!

We took shifts at the new house today. Austin ripped out some floors this morning, so new ones can go in this week. 


Austin bought a pry bar to get the boards up. And we didn't rip out perfectly good floors! We visited the house two times after deciding to buy it (went twice for that, too) and the longer we were there, the more we realized the serverity of the buckling, bowing, creaking and water damage (dishwasher issue, we think). We realized they weren't genuine hard wood floors, so they couldn't be refinished. We actually think they're original to the 22-year-old house so they've seen a lot of wear. Austin doing all this manual labor saved us $700 on the floor install, however, we still have to work out logistics on getting it removed from the house. We also need a rotting swingset removed if anyone has tips on that!

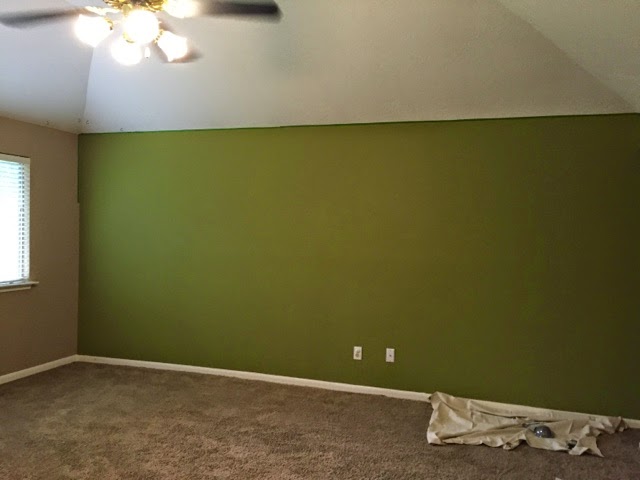
I went in for the paint in the afternoon. There is so much green in this house! There's also a green room with purple shelves (that's so 90s, y'all). This is how our game room used to look:


I am not into accent walls - personal preference. This one was really bright and  one of the first things you see from the front door. I started by taping it off & cutting in on the edges with primer:


Then I painted one coat of primer. I just needed to cover that green, since going from darker or brighter colors to another color can be really difficult.


Without primer, I would've have to paint a lot more coats of the mocha color. This way, I actually got away with one coat of primer, and not quite two coats of mocha. 

I followed the primer with more cutting in with the mocha color, followed by rolling in the middle. Cutting in can be a painstaking task, but it really saves some time in the long run as you're less likely to mess up your edges. 


BOOM!

I also riddled our home of some woodland animals in Ethan's room (much to Austin's chagrin):


Sayonara, suckers. 


Around this point, I realized I couldn't find the matching paint for this room, but I knew this was a possibility all along. I chose to prime the animals because I will eventually either successfully match this paint color, or I will (sigh....) paint Ethan's entire room. Ugh. I'm pretty determined to match that darn color. And while I made jokes about ridding my house of the creatures, I ultimately made the decision to remove them because Ethan's decor is nautical, and I would rather spend a few bucks on paint than have to toss what I have for him already.

Tomorrow morning, the movers come! It's going to be a crazy place for about 3 days, what with sticky floors and a generally non-child-friendly environment, but come Wednesday we should have beautiful engineered hickory floors with rustic details. (Eeek!) Next week we might look a little more like a home!

Stay tuned...

xo,

Sunday, September 7, 2014

a day in the life

I am a part-time worker-bee, part-time stay at home mom. I like the arrangement we have for right now, because I get more time with Ethan than I would in a full-time position, Ethan gets to play with other children, and someone else battles to feed him lunch (it's a mess whether I do it or he does). It's a win-win, minus all the extra snot which stems from being in constant contact with other little-bitties.

On Friday, I was off. I had just gone to a Noonday Trunk Show with some girls from our church on Thursday here in the neighborhood, from which I did not return until about 11 PM. Yikes! So when Ethan cried to wake up at 6:30 AM on my day off, I said "NOOoooooooo," and rolled over. I hoped he would go back to sleep, and he seemed to. In effect, I 'snoozed' my child (you can start getting judgey now). I justify this with mornings like today, in which my son, who went to bed at 8 PM, has to be woken up at 8:40 AM because he will otherwise just keep sleeping. I know the kid is capable. Of course, his mom and dad were both up at 7:30 AM today, so we just can't win.

Unfortunately for me, Ethan had filled up his diaper on Friday morning, so when I went in to get him at 7:30 AM, he had covered himself - head to toe - in the diaper's contents. By this time, Austin was well on his way to work, so this mama got to wage the war against germs and sickness solo -- including the screaming in the bathtub because somebody was HANGRY! Come on, mama!

All that is to say, having kids doesn't make early mornings easier - it just makes them necessary. Don't you all just want lots of babies?!

I have to say, Ethan is a delightful little boy. I wouldn't trade him for the world, and despite mornings like this, I still want another little human someday. Some mornings, he even wakes up happy and babbles to us through breakfast - it's sweet. But folks, you can tack my Friday morning experience onto the blog post I wrote a while back for those thinking of having/adopting a little human.

Other awesome things accomplished this weekend:

-Austin had a guy's night with his best friend (this is a rarity, but awesome for them).

-New faux mount above the bed. I'm looking for an ornate oval frame (probably will settle for an IKEA one, but I'm not totally sold yet...).

-We finally found inexpensive and plain pillow covers for the Man Cave couch.

-We bought a cheap IKEA desk for Austin to work on so he can stop stealing my sewing table.

-I created a new pathway from driveway to back yard (through our new-ish gate) using leftover decomposed granite from our patio reno, and leftover landscaping stones from the previous owners.


-Austin moved a BUNCH of dirt from the front yard. Next phase is sod and adding more of those landscaping stones around the edge of the area we kept the dirt in. We're also looking for groundcover that does well in our area and in shade. And possibly drought. Any suggestions?

Hope y'all had a happy and totally glamorous weekend, too!

xo,

PS - someone tell our neighbors we're sorry our trash can is on the street. The City told us to put it there. The trash guys broke it and it's just sitting out there, lidless, collecting water and stinking it up with all those diapers. We are awesome neighbors.

Monday, August 4, 2014

master bath renovation: week 1

We just got back from a FABULOUS vacation in Colorado. I'm really not sure how/why we came home. I mean the weather there is just fantastic. Who knew "Summer" could be a high of 75 and glorious days surrounded by mountains?

One thing we learned: no more flights with babies... at least not for a while. It's just not enjoyable, folks. We'll be leaving the screaming baby behind on future flights, including our trip to Germany this December. We're thankful to live near our parents and grandparents so we have that luxury!

Anyway, on to the bathroom renovation!

Uneven floors where terrazzo was ripped out
(and my mom's pedicured foot)
Our contractor got to tearing out our bathroom while we were gone, and there were two weird things they found when the walls came down and the floors came up: the previous remodelers had stacked terrazzo on top of terrazzo, so a lot of terrazzo had to be torn out, and the vent pipe from our dryer... just ended in our wall. It didn't vent anywhere and it was so dented and full of lint that it was probably an unbelievably risky fire hazard. Hooray! So glad we remodeled! Oh, and there was also a potential disaster waiting to happen in some corroded pipes. Yeah, just awesome stuff in these old homes.

Dented, damaged, useless dryer vent pipe
Now, for some Before|During photos:

Former vanity area, future toilet area

Former single sink + toilet, future double vanity

Former shower, future open space (!)

Former creeper tub with mirror, future HUGE bathroom!
Excited to see what happens in weeks two and three!

xo,

Wednesday, May 28, 2014

adventures in tiling

Have you ever had a home project that you were utterly intimidated by? I'm really not sure why I ever thought that tiling the backsplash of our kitchen was a good idea. I never, ever thought I would be the one tiling something in our house, and I don't want to do it again. I think it's a skilled position - even skilled tilers can screw it up, so my inexperienced self could really screw it up.

Pre- that picture falling
When we did our bathroom remodel, we told ourselves that we would put up a backsplash. The wall behind the vanity is concaved because of where the piping is (I don't remember exactly why), so there's a little tiny gap behind the vanity in the center. To keep things clean, I thought we should add a small backsplash. This would also serve to protect our brand-new drywall in there. A month or two ago, we found penny round glass tiles half off/on clearance at Lowe's, and decided to go for it. We paid $10 for the tile, and I already had grout. The grout I have is actually able to be used as the mounting and the grouting... which I'm sure means it's not the best quality, but it's just a backsplash. Right?

Pre-tile
It was really hard to put the grout stuff behind where the faucet is. In retrospect, we should've removed it. I had issues trying to get the tile to "stick" because of that (or getting enough stuff behind the tile).

Pre-grout
Once it had time to dry, I took off the adhesive lining (like a sheet of thick packing tape) that held the tile together. It was nice to have when I was putting the tile up because it made putting the tile up a breeze, but when I pulled it off, it pulled off about 10-15 of the tiles. Not too bad, and probably a plus because I thought of it as identifying weaknesses that I could fix. Better now than in a month when it just falls off, right?

You have to wait 24-36 hours to put the grout in, so since I had waited 18 hours to remove the sticky stuff and had to re-adhere some tiles, I waited another day to add the grout. This part made me nervous because I wasn't sure how pretty I could really make this look, and, with most of my projects, I dove in before doing adequate research.

I tried using one of those tiling tools that's meant to smooth out the grout but after I was sufficiently afraid of scraping the glass tiles, I just got in there with my fingers and wiped the grout across it and worked the grout into the cracks of all those little tiles.

Grouted
Then I took a couple of wet junk towels (should have used a damp, large sponge) and wiped it down, followed by wiping with a couple of dry ones. Tomorrow, when it dries, I'll take another wet towel and wipe down any grout on the tile that I may have missed.


Before:

After:

This project turned out much better than I anticipated. What's next on my list? Painting with a sprayer. I need to paint some exterior wood and some 12-odd doors in our house. I'm also dreading this one so... any volunteers?

xo,
P.S: Check out other guest bathroom posts here.